Saturday, January 31, 2009

Elizabeth's December Pie - Apricot Jam Crostata


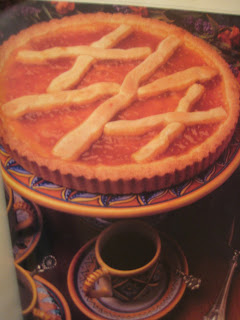
(Picture from Sunset Magazine. I don't drink coffee.)


Apricot Jam Crostata
(Crostata di Marmellata)
Source: Sunset's Fresh Ways with Italian Cooking
Event: Santo Stefano

I've been making this recipe since my mission 14 years ago. I had jam crostatas like this many, many times on my mission (I never had a free-form crostata in Italy. Maybe that's a Southern Italian thing?) The recipe is super easy. I made it for years with just a bowl, a mixing spoon, a couple of knives, and a fork, so a food processor isn't necessary.

This particular crostata was made for Santo Stefano, which is the day after Christmas in Italy (Wikipedia says that St. Stephen's Day is to honor Christianity's first martyr, but no one I talked to in Italy knew who he was. For Italians, most holidays are just another excuse to eat, so it's all good).

I usually make a huge, multi-course meal for friends on Santo Stefano, but this year I couldn't do it. I'm barely keeping my head above water, and I just couldn't do something that elaborate. So Jeff and I took some friends out to dinner at an Italian restaurant instead. It was super fun, and there was no clean up! To honor the cooking aspect of the holiday, though, I still wanted to make something, so I made this very Italian dessert, Apricot Jam Crostata.

Sunset cookbook's note: "Ask an Italian to name the dessert remembered most fondly from childhood, and the answer will probably be crostata. But you can enjoy this jam-filled tart even if you didn't grow up in Rome or Florence -- It's easy to make right at home."

Apricot Jam Crostata

2 cups flour
2/3 cup sugar

1/2 tsp baking powder

1/4 tsp salt

1/2 cup cold butter, cut into small pieces

1 large egg

1 large egg yolk

1 jar (18 oz) good-quality apricot jam (I think this is too much. I'd say 14 oz max. It spills over the sides otherwise, and looks ugly)

1/4 cup water (Again, I say a little less)


In a food processor, mix flour, sugar, baking powder, and salt. Add butter and whirl until fine crumbs form. Add egg and egg yolk; whirl until evenly moistened. If mixture is too dry, mix in cold water, 1 tablespoon at a time, until clumps of dough hold together when squeezed.
Gather dough into a ball.

Cut off about a fourth of the dough, wrap in plastic wrap, and refrigerate. Press remaining dough over bottom and up sides of a 10- or 11-inch tart pan with a removable rim.

Mix jam and the water; spread evenly in crust.


Place reserved dough on a lightly floured board. With your fingers, roll dough into a 6-inch-long log. Cut log in half crosswise. Cut one piece in half crosswise; cut other piece into quarters crosswise. With your fingers, roll the 2 larger pieces into thin 8-inch-long ropes. Crisscross the ropes on top of the jam to form an X in the center of the tart.

Roll remaining 4 pieces of dough into 4-inch-long ropes; crisscross on jam to form 2 small X shapes, one on each side of the big X.


Bake tart in a 350 degree oven until crust is barely golden, about 30 minutes. Let cool in pan on a rack for at least 30 minutes before serving (otherwise, jam will run). Remove pan rim and cut tart into wedges to serve. Makes 8 servings.

Friday, January 30, 2009

A Bake Off! - Elizabeth's attempt to make it into baking immortality (and how she was beaten by a box)


Gather around me, children, while I tell you the classic tale of when I entered the Akron First Ward Chili, Cornbread, and Pie Cook-Off.

It's a harrowing tale, full of toil and turmoil, and eventually revenge (I'm joking about the revenge) (....or am I?????)

It took place in November at the church building. Naturally I had to bring pies! It's the Year of Pie, after all!

During the weeks prior to the event, I dedicated much thought to my choices---thoughts along the lines of, "What are my best pies? What pies would the judges most want? No, who cares what the judges want, what pies would be most fun to make? Wait, cancel that.....what pies would the judges most want?" etc. I ended up making two pies: Apple Pie and Chocolate Cream Pie. (The reason for doing two pies was this: I decided apple was my best, but I don't like apple pie, and I wanted something for me too!)

Here are the pictures:


Neither pie turned out how I wanted it to, and the sad part is that I don't know why!

First, the apple pie: The crust was fab-u-lous, but the apples turned nearly to applesauce inside. Bizarre! I made it precisely according to the directions that I've used 4 times now, except that I didn't weigh the apples this time (my scale was out of batteries) and instead I counted the apples as described in the recipe. Is it possible that I put too few apples inside? It sure didn't seem like it. But the texture wasn't very good, so I must have made an error somewhere.

Second, the chocolate cream pie (the recipe follows): Very tasty, except for the whipped cream on top. This is the second time I have had a "bum" batch of whipping cream. I didn't even think that was possible! But twice now I have had cream that just doesn't whip properly (and I've made whipped cream hundreds of times). It turns clumpy and runny instead. I do everything the same, including having cold cream, utensils, and bowl, and it still doesn't turn out. I guess I'm periodically doing something wrong here too, but I don't know what it is. Argh.

Anyway, I showed up at the event with my family, excited to see all of the pies. THIS IS WHERE THE TALE GETS WILD AND CRAZY!

There were some great looking pies! I couldn't wait to try them. There was one particular apple pie that looked amazing and I was so excited for that cook! (Sure, I entered to win, but I also entered for the pie experience, it being Year of Pie and all. I wanted to learn from the other pie people!)

I did get to taste a few pies, but not a lot. The pies were the dessert that night for the many people who attended the event, so I couldn't very well take some of each.

NOW IT'S EVEN WILDER AND CRAZIER! HOLD ON TO YOUR HAT!

The announcer gets up to tell everyone who won the pie contest. It is aptly named "The 'Your Grandma Would Be Proud' Award." I knew both my pies hadn't made their best showing, so I wasn't exactly feeling like I was in the running, but still! It's so exciting! We are all on the edge of our seats! We are all riveted! (For the purposes of my story, we are all riveted. RIVETED.) The announcer says the name. It's not me, but as the woman walks to the front, I'm clapping and grinning and thinking, "Oh, take the mic and tell the whole story! Tell why you made your pie, where you got the recipe (is there a long history to it? an heirloom recipe?), how long it took you to make it, and why you're so so SO glad your sweat and labor paid off!"

She takes the microphone! She's going to tell us about the recipe!!!

"It's so funny that I won. I just picked up a boxed mix at Aldi an hour before the cook-off and made it in 5 minutes."

5 MINUTES!!!!! No story, no toil, no heirloom, no "scratch," no nothin'. "Your Grandma Would Be Proud" Award? WHAT?? My jaw literally hung open. My husband turned to look at me, saw my stunned look, and we cracked up laughing. I kept saying, "I got beaten by a box! I got beaten by a box!" To be beaten by a formidable foe....there's honor in that! But a box???! We laughed all the way home. 5 minutes and a box beat 4 hours, 2 fabulous recipes, and one newly minted pie maker. ...Oh, and a seasoned baker --- that one great looking apple pie? Turns out it was the pie of my friend Kary, who is one of the best bakers I know! It just goes to show.......we need better judges. :) hahahaha!

**************************************

Chocolate Cream Pie
Source: America's Test Kitchen

Makes on 9-inch pie, serving 8 to 10. Published May 1, 2001.

For the best chocolate flavor and texture, we recommend either Callebaut semisweet and unsweetened chocolates or Hershey's Special Dark and Hershey's unsweetened chocolates. Do not combine the yolks and sugar in advance of making the filling--the sugar will begin to denature the yolks, and the finished cream will be pitted.

Ingredients

Chocolate Cookie Crumb Crust
16 Oreo cookies (with filling), broken into rough pieces, about 2 1/2 cups
2 tablespoons unsalted butter , melted and cooled
Chocolate Cream Filling
2 1/2 cups half-and-half

pinch table salt
1/3 cup granulated sugar
2 tablespoons cornstarch
6 large egg yolks at room temperature, chalazae (protein strands attached to yolk) removed (see related Quick Tip)
6 tablespoons unsalted butter (cold), cut into 6 pieces
6 ounces semisweet chocolate or bittersweet chocolate, finely chopped
1 ounce unsweetened chocolate , finely chopped
1 teaspoon vanilla extract

Whipped Cream Topping
1 1/2 cups heavy cream (cold)
1 1/2 tablespoons granulated sugar
1/2 teaspoon vanilla extract

Instructions

  1. For the Crust: Adjust oven rack to middle position and heat oven to 350 degrees. In bowl of food processor fitted with steel blade, process cookies with 15 one-second pulses, then let machine run until crumbs are uniformly fine, about 15 seconds. (Alternatively, place cookies in large zipper-lock plastic bag and crush with rolling pin.) Transfer crumbs to medium bowl, drizzle with butter, and use fingers to combine until butter is evenly distributed.

  2. Pour crumbs into 9-inch Pyrex pie plate. Following illustration below, press crumbs evenly onto bottom and up sides of pie plate. Refrigerate lined pie plate 20 minutes to firm crumbs, then bake until crumbs are fragrant and set, about 10 minutes. Cool on wire rack while preparing filling.

  3. For the Filling: Bring half-and-half, salt, and about 3 tablespoons sugar to simmer in medium saucepan over medium-high heat, stirring occasionally with wooden spoon to dissolve sugar. Stir together remaining sugar and cornstarch in small bowl, then sprinkle over yolks and whisk, scraping down sides of bowl, if necessary, until mixture is glossy and sugar has begun to dissolve, about 1 minute. Whisk yolks thoroughly in medium bowl until slightly thickened, about 30 seconds. When half-and-half reaches full simmer, drizzle about 1/2 cup hot half-and-half over yolks, whisking constantly to temper; then whisk egg yolk mixture into simmering half-and-half (mixture should thicken in about 30 seconds). Return to simmer, whisking constantly, until 3 or 4 bubbles burst on the surface and mixture is thickened and glossy, about 15 seconds longer.

  4. Off heat, whisk in butter until incorporated; add chocolates and whisk until melted, scraping pan bottom with rubber spatula to fully incorporate. Stir in vanilla, then immediately pour filling into baked and cooled crust. Press plastic wrap directly on surface of filling and refrigerate pie until filling is cold and firm, about 3 hours.

  5. For the Topping: Just before serving, beat cream, sugar, and vanilla in bowl of standing mixer on low speed until small bubbles form, about 30 seconds. Increase speed to medium; continue beating until beaters leave a trail, about 30 seconds more. Increase speed to high; continue beating until cream is smooth, thick, and nearly doubled in volume and forms soft peaks, about 20 seconds. Spread or pipe whipped cream over chilled pie filling. Cut pie into wedges and serve.
Sunday, January 25, 2009

Ann's December Pie - Indiana Buttermilk, and a Tale of Woe

I had planned a massive pie blowout for our last month in the Year of Pie, and reserved a special night with my roommates to make not one, but THREE pies for our personal apartment Christmas party. My favorite pie book had three pies that had "Indiana" in the title, more than any other state, as well as multiple references to my beloved adopted home within sidebars and commentary. How could I choose between them? I needed to make them all: buttermilk, butterscotch, and sugar cream (which is the unofficial state pie).

I bought all the ingredients I would need and had made my pie dough, and was ready to make everything that night, when I realized that I had a slight problem. I only have one real pie plate. Was it worth it to me to own three pie plates? I wasn't sure. My roommate Marcue offered to buy a couple at Walmart, and if I didn't want them both she would take one. It sounded like a great plan, so we were set.

When I rolled out the dough that night, I thought that it seemed very elastic, slightly different than I had experienced before. I had remembered that one batch had needed a lot of water to come together, so even though it was easy and lovely to roll, I wasn't sure how it would turn out. But I fitted everything in its plate and put them each in the oven. And then....

Pie #1:
Obviously, it shrank like crazy, but the sides collapsed despite the weights I'd put in the bottom, and it seemed to have a very bready consistency. There was no way I could fill it - it would have simply fallen over the edges.

Pie #2:

Burn pie does not for good eats make. Into the trash it went.

Pie #3:
Despite the inconsistent coloring and the bread texture, it seemed the most promising, until I set it own on the counter when I took it out of the oven, when the pie plate shattered the instant it touched the counter. I've never seen anything like it, and I just stared in disbelief for several seconds. Were there flaws in the glass? Was it of poor quality in the first place? Was I expecting too much from Walmart? I'm guessing all of the above. But seriously, shattered glass pie? I can't serve that! Even though most of the pieces were quite large, I couldn't risk serving it with any chance of glass being left on it. Needless to say, pie was not had that night at all. But we did end up playing baseball in the apartment!


I had a Christmas party to attend the next day, and everyone else was leaving for vacation later in the week, so I knew that despite the fact I had another week in town by myself, I wouldn't have anyone to share my pie with and I needed to make one that night. So I knocked out a crust and baked a buttermilk pie the next day before the party. It was the easiest one to make, and it was a custard pie, which I hadn't tried yet. The pie itself was good, but not very exciting, but it was old-fashioned and seemed very Indiana, so mission accomplished. The filling was tangy and a little crumbly, and my friends really liked it. But I can't help but be a little disappointed that it wasn't the pie extravaganza I had planned for the end of the year. You can't win them all, right?

Indiana Buttermilk Pie
from Pie: 300 Tried-and-True Recipes for Delicious Homemade Pie by Ken Haedrich

1 partially prebaked pie crust

Filling:
1/2 cup firmly packed brown sugar
1/2 cup granulated sugar
3 tablespoons flour
Pinch of salt
3 large eggs
1 large egg yolk
1 teaspoon vanilla extract
1 1/2 cups buttermilk
3 tablespoons unsalted butter, melted

Combine the sugars, flour, and the salt in a food processor and pulse to combine. Add the eggs, egg yolk, and vanilla and pulse again. Add the buttermilk and butter and process for 5 to 7 seconds, until well blended. Slowly pour the filling into the cooled pie shell.

Place the pie on the center oven rack and bake until the top is golden brown and the custard is set, about 40 minutes. Rotate the pie 180 degrees halfway through the baking, so it cooks evenly. When done, the center may move slightly when the pan is shaken.

Transfer the pie to a wire rack and let cool thoroughly. Serve at room temperature or cover and cool.


Wednesday, January 21, 2009

Ann's November Pie: Apple Cheddar

One of the very first things I told Listle when we talked about Year of Pie was that I wanted to make an apple pie with cheddar. I've been fascinated with this idea ever since I read Farmer Boy when I was little. I found a fun recipe in John T. Edge's Apple Pie: An American Story, collected a group of friends to eat the pie, and went to work.


I've talked about using hand-picked fruit in several other posts, and I was able to dot it here. Except I didn't actually pick the apples myself. But I did go to an orchard to get them and it was so much fun! The crust had extra-sharp cheddar mixed into it, and then the top crust had grated cheddar sprinkled onto it and kind of pressed into the dough. When I put the pie together, I placed the cheese-side down so that the cheese would melt into the apples. Nummy!!!


After I formed the edge, I cut vents in the top and I suddenly had an American icon on my hands.


It baked so happily in the oven and I could tell that it was going to be an awesome pie. When I opened the oven door to pull it out, I recalled with joy my conversation with Listle about her apple pie, when she expressed how great it was to see this beautiful pie emerging from the oven, knowing that she had made it herself, and as I let those thoughts dance around my head, this happened:

Yeah, that's right, I dropped it. I dropped my beautiful American icon. I may have well thrown up on the home plate of a baseball game while flipping off my grandma because I ruined my personal slice of Americana. Luckily, as I sat on the floor and cried with laughter, my friends came to save the pie as much as possible.


We were able to pick up hot apple slices and cheesy spicy crust with our fingers, and they were quite good. I'm not sure if this is what Laura Ingalls Wilder had in mind when she wrote about my childhood food obsession, but this oven pie is my best offer.
Cheese-Straw Apple Pie
from Apple Pie: An American Story by John T. Edge
Crust:
1 1/2 sticks unsalted butter, cut into small pieces
2 tablespoons cold shortening, cut into pieces
3 cups flour
1 teaspoon salt
1-2 teaspoons cayenne powder (I used chili powder for lack of cayenne)
2 1/3 cups shredded extra-sharp cheddar cheese
1/2 plus 2 tablespoons ice water
Place butter and shortening in the freezer for an hour before using. Pulse flour, salt, and cayenne in food processor. Remove the lid and add the butter and shortening into the mixture. Pulse the machine 4 times to cut in the butter. Add 1 1/3 cups of cheese and pulse four more times. Sprinkle half the water over the mixture and pulse 5 or 6 more times. Add the rest of the water and pulse 5 or 6 more times, until the pastry looks like very course crumbs. Form the dough into two balls, one slightly larger than the other. Wrap in plastic and press into discs. Refridgerate for three hours.
Filling:
5 large, tart apples
1/2 large lemon
1/2 cup dark brown sugar
1 tablespoon flour
1 teaspoon cinnamon
1 teaspoon vanilla
1/2 teaspoon salt
1/4 teaspoon nutmeg
1 1/2 tablespoons butter, cut into six parts
Heat the oven to 400 degrees. Peel and slice the apples. In a bowl, mix all the filling ingredients except the butter with your hands. Set aside and retreive the pie crusts from the refridgerator.
Roll the dough into two circles that are 2-3 inches larger in diameter than the pie plate. Press the bottom crust into the plate, then mound the apple mixture until they fill the crust and dome slightly. Scatter the butter over the mound. Sprinkle the remaining cheese onto the top crust. With a rolling pin, roll lightly to press the cheese into the dough. Place the crust, cheese-side down, on top of the apples. Crimp the edges and vent the crust. Bake at 400 degrees for 10 minutes, then reduce the heat to 350 degrees and bake another 40 to 50 minutes.
Don't drop.

Tuesday, January 13, 2009

Elizabeth and Ann's jointly-made November Pies - Cherry Pie and Pecan Pie


For November, Ann came to Akron for Thanksgiving. She brought her delightful roommate, Marcue.

We made 2 pies--pecan and cherry--and Marcue made a pumpkin cheesecake (which later became "floor cheesecake" when Elizabeth dropped it. Thankfully we had all had a piece).

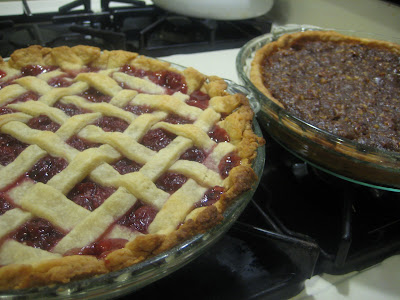
Ann made the crusts for the pecan and cherry pies. It was a velvety and gorgeous dough! Perfection. Elizabeth made the cherry filling, and Ann made the pecan filling. (Ann's note: please read the above as "Ann made the crusts and both the fillings but graciously allowed Elizabeth to claim these as her November pies.")


The cherry filling (Ann's gang sign)


This picture makes Elizabeth glad she cut her hair.


Hands of sisters, Hands of love.


Completed pies. Hurray!

Ann's comment: It was very important to me to make a lattice-top pie this year because to me it seemed the most daunting, yet also the epitome of pie. But who knew! in the end, it was easy as...you know.

Monday, January 12, 2009

Elizabeth's October Pies - Halloween Pie and Pumpkin Cheesecake


Halloween Pie (a.k.a. Vampire Pie, a.k.a. Lime-Coconut Pie)

Source: Icebox Pies, by Lauren Chattman
Event: Book Club

(I'm going to publish this now because I can't get access to the pictures and I really want to post. Check back for great Vampire Pie pictures! ....coming hopefully soon.)

Ms. Chattman's note: "This is easier to make than Key lime pie and has a more pronounced flavor because of the cream of coconut"

2 tablespoons cold water
2 teaspoons unflavored gelatin
One 15-ounce can cream of coconut, such as Coco Lopez
2/3 cup plain yogurt
1/2 cup fresh lime juice
2 teaspoons grated lime zest
One 9-inch prepared graham cracker crust

1. Place the cold water in a small stainless-steel bowl and sprinkle the gelatin over the water. Let the gelatin stand until it softens, about 10 minutes.

2. Whisk together the cream of coconut, yogurt, lime juice, and lime zest in a large mixing bowl.

3. Set the bowl of gelatin over a small saucepan of barely simmering water and whisk the gelatin until it dissolves, 30 seconds to 1 minute. Stir the gelatin mixture into the coconut mixture.

4. Pour the filling into the prepared pie shell. Cover the pie with plastic wrap and refrigerate it until the filling is completely set, at least 6 hours and up to 1 day.


Pumpkin Icebox Pie
Source: Real Simple Magazine (Nov 2008)
Event: Recipe Exchange with pumpkin theme

The title of this pie in Real Simple Magazine is actually "Pumpkin Cheesecake." But it's not a cheesecake. In reality it is an icebox pie shaped like a cheesecake. This is unbaked (no eggs), has only 8 ounces of cream cheese, and it just sets up in the fridge. It has a lighter, less dense, creamy texture, not a traditional cheesecake texture. It seems to be in vogue for magazines to call icebox pies with cream cheese in them "cheescakes."

When I gave my husband a slice, he didn't like it at all. He said, "This is disgusting." But when I said, "Don't think cheesecake...think 'PIE'", he said, "This is great pie!" and ate the whole slice. It cracked me up.

Pumpkin (Cheesecake) Icebox Pie

For the Crust
2 cups graham cracker crumbs (from 14 graham crackers)
2 tablespoons granulated sugar
1/2 cup (1 stick) unsalted butter, melted

For the Filling
1 .25-ounce envelope unflavored gelatin
1 8-ounce bar cream cheese, at room temperature
1 15-ounce can pumpkin puree
1 cup sour cream
3/4 cup granulated sugar
2 teaspoons pumpkin pie spice
1 teaspoon pure vanilla extract

Make the Crust
Heat oven to 400° F. In a medium bowl, combine the graham cracker crumbs, sugar, and butter. Transfer to a 9-inch springform pan. Using a straight-sided dry measuring cup, press the mixture into the bottom and 2 inches up the sides of the pan. Bake until set, 8 to 10 minutes. Let cool.

Make and Chill the Filling
Sprinkle the gelatin over 1/4 cup boiling water. Let stand, stirring occasionally, until dissolved, about 5 minutes.Using an electric mixer, beat the cream cheese until smooth. Mix in the pumpkin, sour cream, sugar, pumpkin pie spice, and vanilla. Mix in the gelatin mixture until incorporated.Pour the mixture into the crust and refrigerate, covered, until firm, at least 2 hours and up to 2 days.

Yield: Makes 8-12 servings


NUTRITION PER SERVING -- CALORIES 458; FAT 29g (sat 17g); CHOLESTEROL 80mg; CARBOHYDRATE 44g; CALORIES FROM FAT 56%; SODIUM 233mg; PROTEIN 6g; FIBER 3g; SUGAR 32g

Saturday, January 3, 2009

Ann's October Pie - Chocolate Satin

As Listle mentioned in her last post, I do accuse her of making chocolate pies all the time, and I still think that she does. I know her better than she knows herself. But you may have noticed that I have not made a chocolate-based pie myself. I actually didn't think that I liked chocolate pie until I tried the one I made this month. I find most chocolate pies to taste sugary rather than chocolatey, and not even creamy the way mousse tastes. I don't see the point of wasting my eating opportunities on it. But then...but then....THIS pie came into my life. It completely changed my opinion of chocolate pie. This recipe came from my friend Mormon Sandicraft, and so now I have another reason to think she's awesome. Plus, it's so crazy easy to make.

Basically, for this pie, you make a dark chocolate mousse and refridgerate it in a pie shell. You can use a regular pastry shell or a graham cracker crust, but I had some almond meal I was trying to use up, so I found a recipe for a nut pastry dough that makes enough for two shells. (I took the other pie to a work party, and I now have a gaggle of devoted pie followers. Hee hee hee!) I enjoy making this pie because the combination of melting satiny chocolate and folding it into fluffy egg whites is always completely satisfying to me.


To make my pie fun and Halloweeny, I decided to make it into a little graveyard, much like a pudding dessert that has little whipped cream ghosts and cookie gravestones and gummi worms that I used to see in womens' magazines when I was a little kid. I had several friends around for fun and funny Halloween night, so everyone got a personal grave with a few "RIP"s in there for good measure.

The decorating process - halved Milano cookies with piped frosting

Brilliance! I found a baggie of chopped almonds in my freezer and added those to give it another element.

I love how glossy and dark the finished pie becomes.

The Supreme Coordinatrix was in town to visit, so of course our night was extra fun.

I love this pie because it's rich and full of chocolate flavor, not just sweet - it has a slight bitter chocolate bite that is countered by the smoothness of the filling. The almonds in the crust and the garnish gave it a nice earthy taste, and I used orange-chocolate Milanos to give a bit of tartness. I can't recommend this pie enough, even without the Halloween accoutrements. I just love everything about it.

Sandicraft's Chocolate Satin Pie

1- 12 oz pkg of chocolate chips
¼ cup milk
¼ cup sugar
Pinch of salt
4 eggs separated
1 tsp vanilla
9” baked pie shell (or graham cracker crust)
Whipped cream
Add chocolate chips, milk, sugar and salt to a bowl and microwave at 50% power 1 min at a time to melt chocolate. Add egg yolks beating them in one at a time. Blend in vanilla. In a separate bowl add the egg whites and beat them until stiff. Gently fold egg whites into the chocolate mix. (Try to incorporate the egg whites without breaking them down - don't worry if the mixture looks kind of splotchy. It'll smooth out as it cools.) Pour into pie shell and refrigerate for 2-3 hours.

Nutty Pie Pastry - makes 2 pie shells

From Pie: 300 Tried-and-True Recipes for Delicious Homemade Pie by Ken Haerich

2/3 cup almond meal (or finely chop almonds in a food processor)

1 1/2 tablespoons sugar

2 1/2 cups flour

1 teaspoon salt

3/4 cup cold unsalted butter, cut into 1/4-inch pieces

2 tablespoons cold vegetable shortening, cut into pieces

About 5 tablespoons cold water

Combine the almond meal, sugar, flour, and salt into the bowl of a food processor and pulse to mix. Scatter the butter over the dry ingredients and pulse 4 or 5 times. Fluff the mixture with a fork, lifting it up from the bottom. Repeat the process with the shortening. Drizzle 3 tablespoons of water over the flour mixture and pulse 5 to 6 times, fluff again, and sprinkle on the rest of the water. Pulse a few more times, until the dough starts to form into clumps.

Form the pastry into 2 balls, flatten them to form 3/4-inch disks, and then wrap each disc in plastic. Refridgerate about 45 minutes. You can freeze one if making only one pie, or double the filling recipe to make two.

Take the chilled pastry out of the refridgerator and allow to soften for a few minutes. Roll out on a floured surface, then fit into a pie plate, and trim and form edge. Place in the freezer for 15 minutes. Prebake shell by putting a piece of aluminum foil to cover the pie shell, and fill with dried beans, rice, or pie weights. Bake for 15 minutes in a 400 degree oven. Remove the weights and foil, lower the temperature to 375 degrees, bake again for another 15 to 17 minutes. Check often for doneness and for puffing. Allow to cool completely before filling.