Dear lone reader,
As you probably have realized, there haven't been any postings in Our Year of Bread in quite some time. This is not due to a lack of devotion to our beloved blog, nor to any horrific falling out between sisters (although Listle has pulled enough stunts in the past year to warrant my hate, as well she knows...). Rather, the major focus of my life completely fell apart, and I just didn't have the desire or energy to pretend to rib my sister about her baking skills, much less make bread. We discussed our options and decided to go on temporary hiatus until I felt like baking again. However, one thing we didn't discuss was who would let everyone know this, so our apologies for keeping you in the dark. A new year usually brings a new baking project, but for us, it brings a return to the Year of Bread. Plus, I have more friends with stand mixers now that live in town! Here's to a better year than 2010, and here's to some wicked awesome bread!!!!
Love, Year of Bread
Tuesday, January 18, 2011
Sunday, May 9, 2010
Ann's March Bread: Brioche
Okay, okay, I know that this post is WICKED late, and I've been enticing the wrath of my sister for the past six weeks. I had good reasons! Such as school and getting engaged. Guess which one I enjoyed more...that's right, reference class! Just kidding, sweetie.
After failing at my bread planning last month, I was determined to do better this month. I only succeeded marginally, but that counts! My entry for an egg bread is brioche, which is a French white loaf bread with lots of butter and eggs to make it rich, almost cake-like (still clinging to last year...). I've never actually had brioche before, so I don't have anything to compare it with to make sure mine was good, but I thought it was really good.
So one of the other reasons I didn't make brioche last month was that, besides my bad timing, I each recipe I looked at said that you couldn't use a hand-held mixer because of the lengthy mixing time the dough requires to get elastic and satiny, and it's a really wet dough that wouldn't work at all to knead by hand (this totally makes sense after having made it). Dorie (I like to think we're on a first name basis now) said in her recipe that she mixed it by hand the first time she made brioche, and it was worse than running a half-marathon. One of the hallmarks of my existence is my laziness, so there was no way I was going to do that. Instead, I elected to spend a day with my lovely friend Mrs. H-B, who happens to have a Kitchen Aid mixer (my #1 priority on my gift registry). I decided to make two recipes (Dorie's and Ina's), just to see what the differences were in texture, since they had quite different methods. Well, my normal method of not adequately planning for time was once again true in this case. I had to keep the Dorie brioche dough refrigerated for a while, and that meant that I had to stay at Mrs. H-B's until super super late. One of the requirements of the recipe was to lift up the dough every half hour to deflate it. Since I also had an hour-long drive home, so this meant that I just reached over to the passenger's seat and punched it down every half hour, and then continued along with one greasy hand.
When I got home, I stored both doughs in the fridge overnight, and then baked them the next day. First, the Ina dough finished, and I couldn't wait for it to cool to before I started eating it. AMAZING. The bread was soft, pliable, and pulled apart in an almost like petals made of elastic. Yeah, I know that doesn't make any sense, but I've thought that analogy for days, and that's what I'm going with. I shared this with Megs and her visiting parents, and we slathered each piece with homemade blackberry jam from Padre. It was completely decadent, but felt comforting and cozy instead of rich. There was a very slight sweetness and the eggs gave it a really distinct flavor that was so different than your average loaf of bread. It had twice as many eggs as the Dorie loaf, which gave it a much deeper yellow color.
The next day, I tried the Dorie loaf. It was also good, but didn't have that same elasticity (although it wasn't as prevalent in Ina's after it cooled, either), and didn't rise as much as the other too. I'm not sure if this was because of my haphazard rising in the car, but the dough was absolutely gorgeous before I got it home (or maybe it dried out too much in the fridge too?), so I'm guessing that's what happened. And, frankly, Dorie has never steered me wrong. Based on pictures from other blogs that have tried the same recipe, I'm pretty certain I just did it wrong. I'll have to try it again when it doesn't involve prying plastic wrap off the bowl with one hand while I try to navigate rural Indiana roads with the other.

The Dorie bread is in the front, the Ina bread in the back.
Ina Garten's Brioche
from Barefoot in Paris
1/2 cup warm water
1 package dried yeast
3 tablespoons sugar
6 extra-large eggs, at room temperature
4 1/4 cups unbleached flour
2 teaspoons kosher salt
1/2 pound (2 sticks) unsalted butter, at room temperature
1 egg mixed with 1 tablespoon milk, for egg wash
Combine the water, yeast, and sugar in the bowl of an electric mixer fitted with a paddle attachment. Mix with your hands and allow the stand for 5 minutes until the yeast and sugar dissolve. Add the eggs and beat on medium speed for 1 minute, until well mixed. With the mixer on low speed, add 2 cups of the flour and salt and mix for 5 minutes. With the mixer still on low, add 2 more cups of flour and mix for 5 more minutes. Still on low speed, add the soft butter in chunks and mix for 2 minutes, scraping down the beater, until well blended. With the mixer still running, sprinkle in the remaining 1/4 cup of flour. Switch the paddle attachment to a dough hook and mix on low speed for 2 minutes. Scrape the dough into a large buttered bowl and cover with plastic wrap. Refrigerate overnight.
The next day, allow the dough to sit at room temperature for 1 hour. Grease two 8 1/2 x 4 1/2 x 2 1/2-inch loaf pans. Turn the dough onto a lightly floured board and cut in half. Pat each portion into a 6 x 8-inch rectangle, then roll up each rectangle into a cylindrical loaf. Place each loaf, seam side up, into a greased pan. Cover the pans with a damp towel and set aside to rise at room temperature until doubled in volume, 2 to 2 1/2 hours.
Preheat the oven to 375 degrees. When the loaves have risen, brush the top of each with the egg wash and bake for 45 minutes, or until the top springs back and it sounds slightly hollow when tapped. Turn the loaves out onto a wire rack to cool.
Dorie Greenspan's Brioche
from Baking: From My Home to Yours
1/3 cup warm water
1/3 cup warm milk
2 envelopes active dry yeast
3 3/4 cups all purpose flour
2 teaspoons salt
3 large eggs (room temperature)
1/4 cup sugar
1 1/2 cups (3 sticks, 12 ounces) unsalted butter, cut into pieces, at room temperature
Egg wash:1 egg, beaten to blend with 1 tablespoon water
Place 1/3 cup warm water, warm milk and yeast in the bowl of a standing heavy-duty mixer; stir until yeast dissolves and let proof for 10 minutes. Add flour and salt, mix on low speed just until flour is moistened, about 1-2 minutes. Scrape the sides and bottom of the bowl with a rubber spatula. Beat in the eggs on low speed, then add sugar. On medium speed, beat until the dough comes together, about 3 minutes. Reduce speed to low. Add butter, two tablespoons at a time, beating until each piece is almost incorporated before adding next. Increase speed to medium-high and beat until dough pulls away from sides of bowl, about 10 minutes. Transfer the dough into a clean bowl and cover with plastic wrap. Let the dough rise at room temperature until almost doubled in volume, about 1 hour. Punch the dough down to deflate it every 30 minutes until it stops rising (it will take 2 hours in total). Cover bowl with plastic and chill in the refrigerator overnight. The next day, butter and flour 2 large loaf pans (8 1/2*4 1/2 inches). Divide dough into 2 equal pieces. Cut each dough half into 4 logs. Arrange logs crosswise in bottom of each prepared loaf pan. Place loaf pans on baking sheet, cover with plastic wrap and let rise for another 2 hours. Preheat oven to 400°F. Brush the brioches with the egg wash (be careful not to deflate, be gentle) and bake until they are golden brown and sound hollow when tapped, about 30-35 minutes. Let cool to room temperature, then run a knife around the side of the pans and turn the loaves out onto a rack. The loaves can also be wrapped airtight and frozen for up to 2 months.
Tuesday, April 27, 2010
Elizabeth's Extra Baking - Cranberry Upside-Downer

I know you are all waiting for Ann to post her March bread. Unfortunately, she is busy with school projects right now, and by school projects, I mean "Facts of Life" marathons with her new fiance.
I figured that while we wait for Ann to post her bread, I could share a recipe I made a couple days ago (plus, I'm sick today and I don't want to do much of anything else).
We invited friends over for dinner on Sunday, but it was kind of last minute. Since I don't go shopping on Sunday, I knew I'd have to use only the ingredients I already had on hand. Dinner ended up being Spaghetti alla Carbonara, green beans with almonds, and a cucumber salad. Very simple.
Dessert is always the trickiest for me when I do last minute invites, because I start to think of fancy concoctions involving whipping cream and other ingredients that I don't have on hand. I flipped through Dorie Greenspan's book Baking: From My Home to Yours. (Have I mentioned before that this book is a winner? I believe I have! I believe I also may have previously stated that Dorie is amazing and that I want to be her best friend and that I think we might really enjoy selecting ingredients at the farmer's market together. But I digress.)
I saw the Cranberry Upside-Downer recipe in the book, and I remembered that I had a bag of cranberries in the freezer and some red currant jelly downstairs in the pantry. Hurray! Let's get baking!
The cake turned out to be magnificent. I did leave off the walnuts, since I didn't know how our guests felt about nuts, and the cake was still fabulous. It was subtly flavored with cinnamon, and the cranberries on top were a perfect balance of tart and sweet. Another winner from Dorie Greenspan.
Someday, with the help of Ms. Dorie, my children will not immediately picture white cake with colored icing when I say the word "cake." They'll know that cake can be so much more! But it will probably be a loooooooooong time before that will happen.
Cranberry Upside-Downer
from Baking: From My Home to Yours, by Dorie Greenspan
Makes 6 to 8 servings
1 cup all-purpose flour
1 teaspoon double-acting baking powder
1 teaspooon cinnamon
1/4 teaspoon salt
1 3/4 sticks (14 tablespoons; 7 ounces) unsalted butter, at room temperature
1 cup minus 2 tablespoons sugar
1/4 cup chopped walnuts or pecans
2 cups cranberries, fresh or frozen (if frozen, do not thaw)
1 teaspoon pure vanilla extract or 1/2 teaspoon pure almond extract
2 large eggs
1/3 cup whole milk
1/3 cup red currant jelly
Getting ready: Center a rack in the oven and preheat the oven to 350 degrees F. Put an 8-x-2-inch round cake pan on a lined baking sheet and keep it at hand. Whisk together the flour, baking powder, cinnamon and salt and keep these nearby, too.
Melt 6 tablespoons of the butter in a small saucepan. Sprinkle over 6 tablespoons of the sugar and cook, stirring, until the mixture comes to the boil. Pour this evenly over the bottom of the cake pan, scatter over the nuts and top with the cranberries, smoothing the layer and pressing it down gently with your fingertips. (Don't be concerned if you've used frozen berries and they've caused the butter to congeal - everything will melt in the oven.) Set aside.
Working in a mixer fitted with the paddle attachment, or in a bowl with a hand mixer, beat the remaining stick (8 tablespoons) of butter on medium speed until smooth. Add the remaining 1/2 cup sugar and continue to beat until pale and creamy, about 3 minutes. Pour in the extract and then add the eggs one at a time, beating for 1 minute after each addition and scraping down the bowl as needed. Reduce the mixer speed to low and add half of the dry ingredients, mixing only until they disappear into the batter. Mix in the milk, then the rest of the dry ingredients. Spoon the batter over the cranberries and smooth the top with a rubber spatula.
Slide the sheet into the oven and bake 40 to 45 minutes, or until the cake is golden and a knife inserted into the center of the cake comes out clean. Remove from the oven and run a blunt knife between the sides of the pan and the cake. Carefully turn the cake out onto a serving platter. If any of the berries stick to the pan - as they might - just scrape them off with a knife and return them to the cake.
Warm the jelly in a small saucepan over low heat or do this in a microwave oven. Gently brush the glaze over the hot cake.
Serving: When the situation allows, I like to serve this cake about 20 minutes out of the oven, when it is still warm. However, it's more than fine at room temperature - even the following day. And, it's always good with vanilla ice cream or sweetened whipped cream.
Storing: The cake is best served the day it is made, but it can be covered and kept at room temperature overnight. Because of the berry topping, it's not a good candidate for freezing.
Monday, March 29, 2010
Elizabeth's February Bread - Cinnamon Rolls using potato dough
 Photo credit: myrecipes.com
 Photo credit: whatscookingamerica.net
My husband prefers the former, although he adores cinnamon rolls any which way. In fact, my husband loves cinnamon rolls so much, I'm surprised he married me before I had ever made him even one batch. (...with this cinnamon roll, I thee wed...) To him, making cinnamon rolls equals showing love, which explains why he made me so many when we were engaged -- especially interesting, since I'm sort of neutral on cinnamon rolls. You can imagine that I was excited to make him this new version. Because a different kind of cinnamon roll is a different kind of love!
The recipe comes from The Bread Bible, by Beth Hensperger. The book was given to me by a friend at Christmastime, and this was my first chance to use it. I wasn't disappointed. Ms. Hensperger's instructions seemed great (which is where many baking cookbook authors fail), but the real proof of that will be when I make a recipe for some item I've never seen before.
I did struggle with the recipe a little bit, but it was all my fault:
1. I wanted to follow everything to the exact letter (even though I've made cinnamon rolls many times), so I tried to keep everything (potato water, tap water, dough) to the precise temperatures specified while having 4 kids underfoot. That wasn't wise. This was a "wait until the kids are in bed" kind of recipe.
2. I didn't use a big enough potato in the beginning (maybe I peeled it too much, because I could have sworn it was 6 oz). It didn't yield enough potato water or puree, so I chose to do that step over again. The potato aspect of this recipe already makes it somewhat more complicated than a standard cinnamon roll recipe, but it didn't help that I tried to add another potato to what I already made. I had my thermometer jumping from pan to pan like a crazy person. I think Jeff's comment was, "Does this recipe really require you to use every bowl in the house?"
 Boiling potatoes on a stove I hope I no longer own in a year.
3. I don't have a food mill, and I didn't want to dirty the food processor. I know, I know. I'm totally weird about that. My food processor is particularly annoying to set up, not to mention the annoyance of cleaning the stupid thing. Still, my decision to press the potato through a sieve was not my brightest moment. It took forever, and it made this weird hairy dot formation on the back of the sieve that made me feel totally sick (I have an issue [I'm not calling it a phobia] with raised dots. More on that later). I should have just gotten out the blasted food processor. It's not that annoying.
Once I finally finished the dough, it was smooth sailing. As far as a review goes, I don't think the additional step of using potato puree turned out anything better than the other cinnamon roll recipes that I've been using for years. For that reason, I wouldn't make this again. But I'm still happy about having tried this recipe: I got some beautiful rolls out of it, and my husband was beyond pleased. He really does go crazy for these things. Did I already mention that? CRAZY! For me, cinnamon rolls are just okay. Nothing to write home about. But at least I like them. Jeff hates my two favorite vegetables: asparagus and cauliflower. Hates! How is that possible?? Life is so, so hard in our house. Harder than the Great Depression. I mean, we don't agree on food. Could it get any tougher, really?
 The rolled out dough, with cinnamon and brown sugar. Note the tomato sauce can in the background. My parents always kept one in the flour to measure one cup, so I do the same.

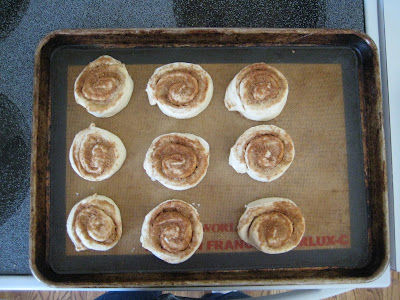 Ready for the oven! (I had another pan with the cinnamon rolls spread out more. These ones are pushed to one side because I was hoping they would "accidentally" touch, making them the "squished together" type of cinnamon rolls, which I like a little better. It didn't work.)
 My hand, after working with the dough. More raised dots. How can that not sick you out? This wasn't quite so gross that I couldn't take a picture, but still. Disgusting.
Cinnamon Rolls
from The Bread Bible, by Beth Hensperger
DOUGH
1 russet potato (about 6 ounces), peeled and cut into large chunks
2 tablespoons unsalted butter
1/4 cup warm water (105°-115° F)
1 tablespoon (1 package) active dry yeast
1/2 cup granulated sugar, or 1/2 cup (packed) light brown sugar
2 tablespoons vegetable oil
1 large egg, at room temperature
1 teaspoon salt
5 to 51/2 cups unbleached all-purpose flour
FILLING
4 tablespoons unsalted butter (1/2 stick), melted
1 1/4 cups packed light brown sugar
1 1/2 tablespoons ground cinnamon
1 cup dark raisins or dried currants, plump in hot water 10 minutes and drained (optional)
1 cup (4 ounces) walnuts or pecans, toasted (see NOTE) and coarsely chopped (optional)
GLAZE
1 cup sifted confectioners' sugar
4 to 5 tablespoons milk
1. In a medium saucepan, combine the potato chunks with water to cover. Bring to a boil, reduce the heat to low, and cook, uncovered, until tender, about 20 minutes. Drain the potato, reserving 1 cup of the liquid. Let the potato water cool to 105° to 115°F. Meanwhile, process the potato with the butter through a food mill placed over a bowl or puree it in a food processor fitted with the metal blade just until smooth. This produces 3/4 to 1 cup of puree.
2. Pour the warm water in a small bowl. Sprinkle the yeast and a pinch of the granulated or brown sugar over the surface of the water. Stir to dissolve and let stand at room temperature until foamy, about 10 minutes.
3. In a large bowl with a whisk or in the work bowl of a heavy-duty electric mixer fitted with the paddle attachment, combine the pureed potato, reserved warm potato water, yeast mixture, remaining granulated or brown sugar, oil, egg, salt, and 2 cups of the flour. Beat hard to combine, about 1 minute. Add the remaining flour, 1/2 cup at a time, until a shaggy dough that just clears the sides of the bowl is formed.
4. Turn the dough out onto a lightly floured work surface and knead until smooth and springy, about 4 to 6 minutes if kneading by hand. If kneading with dough hook or electic mixer, knead 4 minutes on medium speed. Dust with flour 1 tablespoon at a time as needed to prevent sticking. Take care not to add too much flour, because the dough should be very satiny.
5. Put the dough in a greased deep container. Turn once to coat the top and cover the bowl with plastic wrap. Let rise in a warm place until doubled in bulk, about 1 hour. Gently deflate the dough and let rise a second time until doubled in bulk, 50 minutes to 1 hour.
6. Preheat the oven to 350°F. Place an oven rack in the middle of the oven. Line a baking sheet with parchment paper.
7. Gently deflate the dough and turn it out onto a lightly floured work surface. Divide the dough into 2 equal portions. Roll out each portion into a 10-by-14-inch rectangle at least 1/4 inch thick. Brush the surface of each rectangle with the melted butter. Sprinkle the surface of each rectangle evenly with half of the brown sugar and cinnamon, leaving a 1-inch border around the edges. Sprinkle with the raisins or currants and nuts, if using. Starting from the long side, roll the dough up jelly-roll fashion. Pinch the seams together and, using a serrated knife or dental floss, cut each roll crosswise into 9 equal portions, each 1 to 1 1/2 inches thick. Place each portion cut side up on the prepared pan at least 2 inches apart. Press gently to flatten each swirl slightly. (Alternatively, place in 18 greased 3-inch muffin-pan cups for a top-knot effect.) Cover loosely with plastic wrap and let rise at room temperature just until puffy, 20 to 30 minutes.
8. Put the baking sheet or muffin cups in the center of the oven and bake 25 to 30 minutes, or until golden brown and firm to the touch. Using a metal spatula, transfer to a wire rack. Immediately prepare the glaze by combining the confectioners’ sugar and milk in a small mixing bowl and whisking until smooth. Adjust the consistency of the glaze by adding more milk, a few drops at a time, to make a pourable mixture. Dip your fingers or a large spoon into the glaze and drizzle it over the rolls by running your hand or the spoon back and forth over the tops. Or, apply the glaze to the rolls with a brush. Let sit until just warm before eating.
NOTE: To toast nuts, preheat the oven to 350°F. Spread the nuts on a sided baking sheet and toast, stirring once or twice, until fragrant and lightly browned, about 8 to 10 minutes for walnuts (halved) and pecans.
TO MAKE AHEAD: Dough may be made ahead and refrigerated overnight, covered with a double layer of plastic wrap. Let stand at room temperature 3 to 4 hours before filling and rising. Once made, the buns can be stored at room temperature for up to 3 days or freeze in self-sealing freezer bags for up to 3 months.
The recipe comes from The Bread Bible, by Beth Hensperger. The book was given to me by a friend at Christmastime, and this was my first chance to use it. I wasn't disappointed. Ms. Hensperger's instructions seemed great (which is where many baking cookbook authors fail), but the real proof of that will be when I make a recipe for some item I've never seen before.
I did struggle with the recipe a little bit, but it was all my fault:
1. I wanted to follow everything to the exact letter (even though I've made cinnamon rolls many times), so I tried to keep everything (potato water, tap water, dough) to the precise temperatures specified while having 4 kids underfoot. That wasn't wise. This was a "wait until the kids are in bed" kind of recipe.
2. I didn't use a big enough potato in the beginning (maybe I peeled it too much, because I could have sworn it was 6 oz). It didn't yield enough potato water or puree, so I chose to do that step over again. The potato aspect of this recipe already makes it somewhat more complicated than a standard cinnamon roll recipe, but it didn't help that I tried to add another potato to what I already made. I had my thermometer jumping from pan to pan like a crazy person. I think Jeff's comment was, "Does this recipe really require you to use every bowl in the house?"
 Boiling potatoes on a stove I hope I no longer own in a year.
3. I don't have a food mill, and I didn't want to dirty the food processor. I know, I know. I'm totally weird about that. My food processor is particularly annoying to set up, not to mention the annoyance of cleaning the stupid thing. Still, my decision to press the potato through a sieve was not my brightest moment. It took forever, and it made this weird hairy dot formation on the back of the sieve that made me feel totally sick (I have an issue [I'm not calling it a phobia] with raised dots. More on that later). I should have just gotten out the blasted food processor. It's not that annoying.
Once I finally finished the dough, it was smooth sailing. As far as a review goes, I don't think the additional step of using potato puree turned out anything better than the other cinnamon roll recipes that I've been using for years. For that reason, I wouldn't make this again. But I'm still happy about having tried this recipe: I got some beautiful rolls out of it, and my husband was beyond pleased. He really does go crazy for these things. Did I already mention that? CRAZY! For me, cinnamon rolls are just okay. Nothing to write home about. But at least I like them. Jeff hates my two favorite vegetables: asparagus and cauliflower. Hates! How is that possible?? Life is so, so hard in our house. Harder than the Great Depression. I mean, we don't agree on food. Could it get any tougher, really?
 The rolled out dough, with cinnamon and brown sugar. Note the tomato sauce can in the background. My parents always kept one in the flour to measure one cup, so I do the same.
I am a horrible estimator and divider. I can't even divide a peanut butter and jelly sandwich evenly. I use a ruler to make that first division properly. Doesn't this look like an arm with a major flesh wound?
 Ready for the oven! (I had another pan with the cinnamon rolls spread out more. These ones are pushed to one side because I was hoping they would "accidentally" touch, making them the "squished together" type of cinnamon rolls, which I like a little better. It didn't work.)
 My hand, after working with the dough. More raised dots. How can that not sick you out? This wasn't quite so gross that I couldn't take a picture, but still. Disgusting.
Between these nasty dots and the flesh wound above, one might get the idea that I'm not trying to inspire your appetite to make these recipes. I promise: baking can be very enjoyable. In fact, there are so many visual and textural things to LOVE that I feel bad for pointing out just the ones that grossed me out. I love the feel of the risen dough. I love the texture of the brown sugar in my hands as I spread it over the flattened dough rectangle. I love the look of the cinnamon as it is shaken out of the container. I love cutting through the rolls and placing them on the pan. I love the feel of mixing the glaze (first it seems dry, then it suddenly is almost too wet), and I love drizzling it over the rolls. If you're even reading this, you probably love those things too!
Cinnamon Rolls
from The Bread Bible, by Beth Hensperger
DOUGH
1 russet potato (about 6 ounces), peeled and cut into large chunks
2 tablespoons unsalted butter
1/4 cup warm water (105°-115° F)
1 tablespoon (1 package) active dry yeast
1/2 cup granulated sugar, or 1/2 cup (packed) light brown sugar
2 tablespoons vegetable oil
1 large egg, at room temperature
1 teaspoon salt
5 to 51/2 cups unbleached all-purpose flour
FILLING
4 tablespoons unsalted butter (1/2 stick), melted
1 1/4 cups packed light brown sugar
1 1/2 tablespoons ground cinnamon
1 cup dark raisins or dried currants, plump in hot water 10 minutes and drained (optional)
1 cup (4 ounces) walnuts or pecans, toasted (see NOTE) and coarsely chopped (optional)
GLAZE
1 cup sifted confectioners' sugar
4 to 5 tablespoons milk
1. In a medium saucepan, combine the potato chunks with water to cover. Bring to a boil, reduce the heat to low, and cook, uncovered, until tender, about 20 minutes. Drain the potato, reserving 1 cup of the liquid. Let the potato water cool to 105° to 115°F. Meanwhile, process the potato with the butter through a food mill placed over a bowl or puree it in a food processor fitted with the metal blade just until smooth. This produces 3/4 to 1 cup of puree.
2. Pour the warm water in a small bowl. Sprinkle the yeast and a pinch of the granulated or brown sugar over the surface of the water. Stir to dissolve and let stand at room temperature until foamy, about 10 minutes.
3. In a large bowl with a whisk or in the work bowl of a heavy-duty electric mixer fitted with the paddle attachment, combine the pureed potato, reserved warm potato water, yeast mixture, remaining granulated or brown sugar, oil, egg, salt, and 2 cups of the flour. Beat hard to combine, about 1 minute. Add the remaining flour, 1/2 cup at a time, until a shaggy dough that just clears the sides of the bowl is formed.
4. Turn the dough out onto a lightly floured work surface and knead until smooth and springy, about 4 to 6 minutes if kneading by hand. If kneading with dough hook or electic mixer, knead 4 minutes on medium speed. Dust with flour 1 tablespoon at a time as needed to prevent sticking. Take care not to add too much flour, because the dough should be very satiny.
5. Put the dough in a greased deep container. Turn once to coat the top and cover the bowl with plastic wrap. Let rise in a warm place until doubled in bulk, about 1 hour. Gently deflate the dough and let rise a second time until doubled in bulk, 50 minutes to 1 hour.
6. Preheat the oven to 350°F. Place an oven rack in the middle of the oven. Line a baking sheet with parchment paper.
7. Gently deflate the dough and turn it out onto a lightly floured work surface. Divide the dough into 2 equal portions. Roll out each portion into a 10-by-14-inch rectangle at least 1/4 inch thick. Brush the surface of each rectangle with the melted butter. Sprinkle the surface of each rectangle evenly with half of the brown sugar and cinnamon, leaving a 1-inch border around the edges. Sprinkle with the raisins or currants and nuts, if using. Starting from the long side, roll the dough up jelly-roll fashion. Pinch the seams together and, using a serrated knife or dental floss, cut each roll crosswise into 9 equal portions, each 1 to 1 1/2 inches thick. Place each portion cut side up on the prepared pan at least 2 inches apart. Press gently to flatten each swirl slightly. (Alternatively, place in 18 greased 3-inch muffin-pan cups for a top-knot effect.) Cover loosely with plastic wrap and let rise at room temperature just until puffy, 20 to 30 minutes.
8. Put the baking sheet or muffin cups in the center of the oven and bake 25 to 30 minutes, or until golden brown and firm to the touch. Using a metal spatula, transfer to a wire rack. Immediately prepare the glaze by combining the confectioners’ sugar and milk in a small mixing bowl and whisking until smooth. Adjust the consistency of the glaze by adding more milk, a few drops at a time, to make a pourable mixture. Dip your fingers or a large spoon into the glaze and drizzle it over the rolls by running your hand or the spoon back and forth over the tops. Or, apply the glaze to the rolls with a brush. Let sit until just warm before eating.
NOTE: To toast nuts, preheat the oven to 350°F. Spread the nuts on a sided baking sheet and toast, stirring once or twice, until fragrant and lightly browned, about 8 to 10 minutes for walnuts (halved) and pecans.
TO MAKE AHEAD: Dough may be made ahead and refrigerated overnight, covered with a double layer of plastic wrap. Let stand at room temperature 3 to 4 hours before filling and rising. Once made, the buns can be stored at room temperature for up to 3 days or freeze in self-sealing freezer bags for up to 3 months.
Friday, March 12, 2010
Ann's February Bread: Uh....also Scones
Well after all the controversy that Listle's last post created, I feel like my month's post will be a bit of a let down. Yes, I too made scones. However, I did not intend to make scones, so does that make it better? I don't know. I had planned on making brioche this month, but somehow neglected to note in the recipe that the dough needed a good night's rest before baking, thus ruining my plans. I needed something quick, but something that wouldn't necessarily feel like a cop out. I also needed to have all the ingredients since I discovered my mistake on a Sunday afternoon and needed to have a delicious bread product ready for book club on Sunday night. So I decided I had to make three different kinds of scones as penance for my lack of recipe reading. Also, I had to make some cupcakes and chicken with brussels sprouts and rice, but I'm not blogging on those things. Suffice it to say, there was a cooking frenzy.
Luckily, the scones came together so quickly and easily that all that cooking wasn't nearly as traumatic as I had expected (the dishes, on the other hand...). I forgot that all baking isn't as time consuming and so full of multiple parts. You just throw some basic ingredients into the food processor and you're good to go! My friend Cheriiiil and I researched and made them together - we had so much fun! We decided that each type of scone had to be formed in a different way, to make the results research seem more complete.
First, we made cream scones with dried cranberries. We ended up combining a couple of different recipes; we had a recipe we wanted to try, but then adapted it with another recipe to create drop scones. They turned out delicate and rich, with a good contrast from the tart cranberries (no currants in my apartment). They spread out more than other drop scones I've had, but they would have been perfect for afternoon tea (I really wish it hadn't been Sunday so I could have gotten some clotted cream to serve with them!). Unfortunately, I didn't get a picture of them, with all of the cooking and book club action, but they were excellent.
Then I made honey-nut scones, courtesy of Dorie Greenspan. They were made with whole wheat flour, walnuts, and sweetened with honey. I made them in the way I've seen scones traditionally made, by cutting circles of dough into sixths and sprinkling with sugar (I used some turbinado sugar). They looked all rustic and homemade, and the sugar on top gave it an extra crunchiness. Perfect breakfast scone.

Finally, I made black olive scones (I wanted something savory to round out my scone experience). I used some salty black Turkish olives and lots of cream in the batter, and then rolled out the dough and cut them into circles and brushed them with olive oil and sprinkled them with Maldon sea salt. The combination of the salt and cream made them taste extra decadent, and the texture was perfect - flaky but crumbly, buttery, and everything a scone should be.

I can't decide which kind was my favorite, since they were all so different, but it was great to explore the variations on scones and really get to know them. Since I felt like last year I didn't get to know the properties of cakes as well as I should have, I want to make sure I really get into that this year, and my Scones, Three Ways helped me get to know scones very well.
Cream Scones/Mrs. Humphries' Scones
adapted from Afternoon Delights by James McNair and Andrew Moore, and The King Arthur Flour 200th Anniversary Cookbook by Brinna B. Sands
3 cups flour
6 tablespoons granulated sugar
4 teaspoons baking powder
3/4 teaspoon salt
3/4 cup (1 1/2 sticks) cold unsalted butter, cut into small pieces
1 1/2 cup heavy cream
3/4 cup sweetened dried cranberries, coarsely chopped
1. Position an oven rack so that the scones will bake in the middle of the oven and preheat the oven to 400 degrees. Like a baking sheet with kitchen parchment and set aside.
2. In a food processor, combine the flour, sugar, baking powder, and salt and pulse to blend well. Add the cold butter and pulse in the food processor until the mixture resembles coarse bread crumbs. Transfer a mixture to a bowl. Add the cream and the cranberries. Stir just until the mixture sticks together.
3. Drop big spoonfuls of the batter onto the parchment covered baking sheet. Bake 15 minutes or until slightly golden brown. Transfer scones from baking sheet to a bowl lined with a kitchen towel to keep them warm.
Honey-Nut Scones
adapted from Baking: From My Home to Yours by Dorie Greenspan
1 large egg
2 tablespoons honey
1/2 cup cold whole milk
1 1/2 flour
1/2 whole wheat flour
1 tablespoon baking powder
1/4 teaspoon baking soda
1/4 teaspoon salt
1 stick cold unsalted butter, cut into small pieces
1/2 cup chopped walnuts
Sugar for sprinkling (I used turbinado)
Center a rack in the oven and preheat to 400 degrees F. Like a baking sheet with parchment paper.
Stir the egg, honey, and milk together.
Pulse the flours, baking powder, baking soda, and salt in the bowl of a food processor. Add the pieces of butter and pulse into dry ingredients until the mixture is pebbly. You'll have pea-sized pieces, pieces the size of oatmeal flakes and pieces the size of everything in between - and that's just right.
Pour the liquid ingredients over the dry ingredients and pulse just until the dough, which will be wet and sticky, comes together. Don't overdo it. Pulse in the chopped walnuts.
Turn dough into a bowl and gently knead the dough by hand, or turn it with a rubber spatula 8 to 10 times. Turn the dough out onto a lightly floured work surface and divide it in half. Working with one piece at a time, pat the dough into a rough circle that's about 5 inches in diameter, cut it into 6 wedges and place on the baking sheet. Sprinkle with sugar.
Bake the scones for about 20 minutes, or until the tops are deeply golden and firmish to the touch. Transfer them from the baking sheet into a bowl lined with a kitchen towel to keep them warm.
Black Olive Scones
from Tea Time Magazine, September/October 2009
2 1/2 cups all-purpose flour
2 tablespoon sugar
2 teaspoons baking powder
1/2 teaspoon salt
1/2 cup cold unsalted butter, diced
1/4 cup chopped black olives (I used Turkish olives, but kalamata or Nicoise would also be good)
2/3 cup whipping cream
Olive oil
Flaked sea salt (I used Maldon)
1. Preheat oven to 375 degrees. Line two baking sheets with parchment and set aside.
2. In the bowl of a food processor, combine the flour, sugar, baking powder, and salt. Add the butter pieces and pulse until the flour mixture resembles coarse meal. Stir in the olives. Pulse in the cream until the mixture is just moistened (that was a terrible paragraph for both Mrs. H-B and me).
3. On a lightly floured surface, roll the dough to 1/2-inch thickness. Using a 2-inch round cutter, cut as many scones as possible, rerolling scraps as necessary (but not more than twice).
4. Place scones on the prepared baking sheets. Using a pastry brush, lightly coat the tops of scones with olive oil; sprinkle with kosher salt. Bake for 16 minutes, or until scones are golden brown.
Monday, March 8, 2010
Elizabeth's January Bread - Scones

Scones are so yummy, and yet so controversial in my family!!
My husband loves scones. But in his household growing up (his parents are from Utah, and he grew up in Arizona), scones were a fried yeast bread, dressed with honey or cinnamon sugar (similar to Indian Fry Bread or Sopapillas). So when someone says "scones," that's what he's picturing.
In my household growing up (my parents are also from Utah, and I also grew up in Arizona), scones were the same baked quick bread that some people refer to as "English scones" or "Scottish scones." Jeff and I used to argue and argue about the true meaning of the word "scone." (We argued a lot in those days about pretty much everything, so scones just slid easily into the argument mix.) There was no information available about it on the Internet back then (1997...and yes, we looked!), so we finally agreed to just call them "fried scones" and "baked scones" respectively. And we also agreed to stop arguing about it.
Fast forward 13 years, and I had forgotten all about our "fried" and "baked" agreement. We don't eat scones very often, and since I've seen a lot of baked scones during the years, I pretty much forgot about fried scones. I swear that when I decided to make scones for my first month of Year of Bread, and I just called them "Scones" without the "baked" qualifier, I wasn't trying to pick a fight! Jeff good-naturedly reminded me of my past agreement... and I grumbled.
The recipe for these scones was featured in a culinary mystery that I read (English Trifle, by Josi S. Kilpack -- a Utah author). To complicate matters, she wrote something in the book about English scones being different than American scones, which, she wrote, "are deep fried." Huh? Where outside of Utah and my husband's family home have I ever seen a deep fried scone? Anyway, I decided to research it again this time around, and it turns out that fried scones ARE INDEED unique to Utah. Besides wanting to do the "I was right, I was right" dance, the truth is that I'm happy for Utah! Really. I do not look down on Utah scones at all (oh whoops, I'm not allowed to call them that. That was part of our agreement. They're not Utah scones, they're fried scones). Anyway, I love regional food, and I hate that regional food is slowly disappearing in America, as people eat more and more Olive Garden, Burger King, and Red Lobster. Actually, regional food is disappearing all over the world, but that's a discussion for another time. (Reminder: eat local.)
So all hail the Utah fried scone!! It should be noted that I can't find any particularly good scholarship on the matter, and any links that refer to such scholarship are broken and lead nowhere. However, it does seem that food historians/anthropologists agree that English/Scottish Mormon settlers in Utah hybridized Indian fry bread and British scones. Why the settlers decided to call them "scones" when they are so different in ingredients and consistency, I'll never know. I suspect they originally shaped them the same way they did with the baked type in their home countries.
All that aside, I chose to make BAKED scones for January. They were amazing. A-MAZ-ING. Amazing like a full moon. Amazing like opposable thumbs. Amazing like OK Go's This Too Shall Pass video. Amazing.
They were tender and flaky and buttery and slightly sweet. All around fabulous! Much more tender and flavorful than an American biscuit. This is probably due to the use of butter and sour cream rather than shortening. So tasty.
The only thing I didn't love was the really long shape of the scones. Once they were rolled out like the recipe stated, the triangles were so long that the points flopped over while they baked. In the future, I will divide the dough in half and then roll out two circles instead of one.
 When the dough first starts to come together, you wonder if it's going to be too dry.
 But then Kapow! It forms a fabulous little ball of Yummy.
 Roll it out into a circle, and cut it into triangles. (Again I'll do two circles next time, rather than one big circle.)
 Brush them with the optional glaze (which I didn't think was so fabulous that it merited buying whipping cream. Maybe you can make it with milk, or you could just go without the glaze.)
 Serve them with clotted cream, jam, and/or butter.
These are so tasty that when you eat them, your taste buds will explode, followed by your brain.
**************************************
Sadie's Scrumptulicious Scones
1 cup sour cream (light works just as well)
1 tsp. baking soda
4 cups all purpose flour
1 cup sugar
2 tsp. baking powder
1 tsp. salt
1/4 tsp. cream of tartar
1 cup butter, cold
1 egg
Combine sour cream and baking soda in 2 cup bowl or measuring cup (mixture expands, so you'll want to have extra space). Set aside. Whisk together dry ingredients in a large mixing bowl. Cut butter into dry ingredients using a pastry blender until mixture resembles course corn meal. Add sour cream and egg, mix until a soft dough forms—use use your hands if necessary. Turn dough onto lightly floured surface and knead a few times, then pat or roll until 1 inch thick. Cut into triangles, or if you prefer, cut into circles with a biscuit cutter. (Elizabeth's note: actually, divide the dough into two parts, and roll each part into a circle. Cut into triangles like a pizza. This gives you smaller, more reasonable scones.) Place scones two inches apart on lightly greased baking sheet. Bake 350 for 20-25 minutes or until bottom edges are golden brown.
Makes 8-14 depending on size of scones.
Glaze: (optional)
1 egg
1 Tablespoon whipping cream
Mix egg and cream together. Brush on top of unbaked scones and bake as directed. Sprinkle glazed and baked scones with powdered sugar. Set oven to broil, but do not move oven rack to the highest level—leave it in the center position. Put pan in oven, keeping door open about an inch and watch closely. Sugar takes 30 seconds to 1 1/2 minutes to turn a golden brown. Remove from oven, serve while still warm.
*To Freeze: Bake scones as directed. When cool, put in Ziploc bag, removing as much air as possible to ensure freshness upon defrosting. To defrost, remove from freezer and let thaw at room temperature for 2 hours. Can reheat in microwave. (Elizabeth's note: I froze some of mine and ate them the next day, taking them straight from the freezer to the microwave. They were perfect.)
Thursday, March 4, 2010
Ann's January Bread: Banana Bread
So I get scared any time we start a new Year, and I always have to start a little easy. For me, that equaled banana bread. I have a favorite Betty Crocker recipe that I've adapted slightly, and so I made it for my roommate Megs' birthday party.
 Banana bread is pretty basic and normal, but I usually make mine more exciting by sprinkling a layer of sugar on top before baking. When it bakes the sugar creates a crackly crust that takes this from a regular quick bread to a special dessert. I also like to serve it with Nutella - bananas and chocolate are so nice together, and this is an easy way to enjoy them. (I guess it's easier to put Nutella on a banana...or eat a banana split...whatever, it's easier than making a cake!) Megs also had some leftover eggnog syrup that'd she'd made (it's actually buttermilk syrup, but she kept calling it eggnog so that's what I call it in my head). I'll add the recipe when I get it from her.


Banana Bread
from Betty Crocker's New Cookbook
1 1/4 cups sugar, plus a few tablespoons to sprinkle on top
1/2 cup butter, softened
2 large eggs
1 1/2 cups mashed ripe bananas (3 to 4 medium)
1/2 cup buttermilk
1 teaspoon vanilla
2 1/2 cups flour
1 teaspoon baking soda
1 teaspoon salt
1 cup chopped walnuts
1.) Move oven rack to love position so the tops of pans will be in the center of oven. Heat oven to 350 degrees F. Grease bottoms only of 2 loaf pans, 8 1/2 x 4 1/2 x 2 1/2 inches.
2.) Mix 1 1/4 cups sugar and margarine in a large bowl. Stir in eggs until well blended. Add bananas, buttermilk and vanilla. Beat until smooth. Stir in flour, baking soda, and salt just until moistened. Stir in the nuts. Pour into pans. Sprinkle enough sugar on top of each loaf to cover the top of the batter completely.
3.) Bake loaves about 1 hour, or until toothpick inserted in center comes out clean. Cool 5 minutes in pans on wire rack. Loosen sides of loaves from pans; remove from pans and place top side up on wire rack. Cool completely before slicing. Serve with Nutella or eggnog syrup.
 Banana bread is pretty basic and normal, but I usually make mine more exciting by sprinkling a layer of sugar on top before baking. When it bakes the sugar creates a crackly crust that takes this from a regular quick bread to a special dessert. I also like to serve it with Nutella - bananas and chocolate are so nice together, and this is an easy way to enjoy them. (I guess it's easier to put Nutella on a banana...or eat a banana split...whatever, it's easier than making a cake!) Megs also had some leftover eggnog syrup that'd she'd made (it's actually buttermilk syrup, but she kept calling it eggnog so that's what I call it in my head). I'll add the recipe when I get it from her.

Happy Birthday, Megs!
Banana Bread
from Betty Crocker's New Cookbook
1 1/4 cups sugar, plus a few tablespoons to sprinkle on top
1/2 cup butter, softened
2 large eggs
1 1/2 cups mashed ripe bananas (3 to 4 medium)
1/2 cup buttermilk
1 teaspoon vanilla
2 1/2 cups flour
1 teaspoon baking soda
1 teaspoon salt
1 cup chopped walnuts
1.) Move oven rack to love position so the tops of pans will be in the center of oven. Heat oven to 350 degrees F. Grease bottoms only of 2 loaf pans, 8 1/2 x 4 1/2 x 2 1/2 inches.
2.) Mix 1 1/4 cups sugar and margarine in a large bowl. Stir in eggs until well blended. Add bananas, buttermilk and vanilla. Beat until smooth. Stir in flour, baking soda, and salt just until moistened. Stir in the nuts. Pour into pans. Sprinkle enough sugar on top of each loaf to cover the top of the batter completely.
3.) Bake loaves about 1 hour, or until toothpick inserted in center comes out clean. Cool 5 minutes in pans on wire rack. Loosen sides of loaves from pans; remove from pans and place top side up on wire rack. Cool completely before slicing. Serve with Nutella or eggnog syrup.
Subscribe to:
Comments (Atom)